
3D World | 219
Future Publishing
Project Info |
Publication | 3D World
Issue # | 219
Issue Date | April 2017
Lexicon | Publications
Created for | Future Publishing
Publication Specs |
Section | Expert Panel Q & A
Image Featured | Meditation Room
Page(s) | 72, 78, 79
Responsibilities | Commissioned Article, 4-Part Tutorial w/ Visuals, Video Tutorial
Description |
Meditation Room was published in the April 2017 issue, #219, of 3D World magazine; one of the top trade magazines for the 3D industry.
In order to showcase my project, Meditation Room, I was asked to join the “Expert Panel” as part of the Q & A segment.
For this, I was commissioned to write a 420-word article which helps to answer a given question. I then answer the question in the form of a
4-part tutorial, an “expert tip,” and supporting visuals to help explain the process. I was also commissioned to create a video tutorial which explains the process in more detail.
Question |
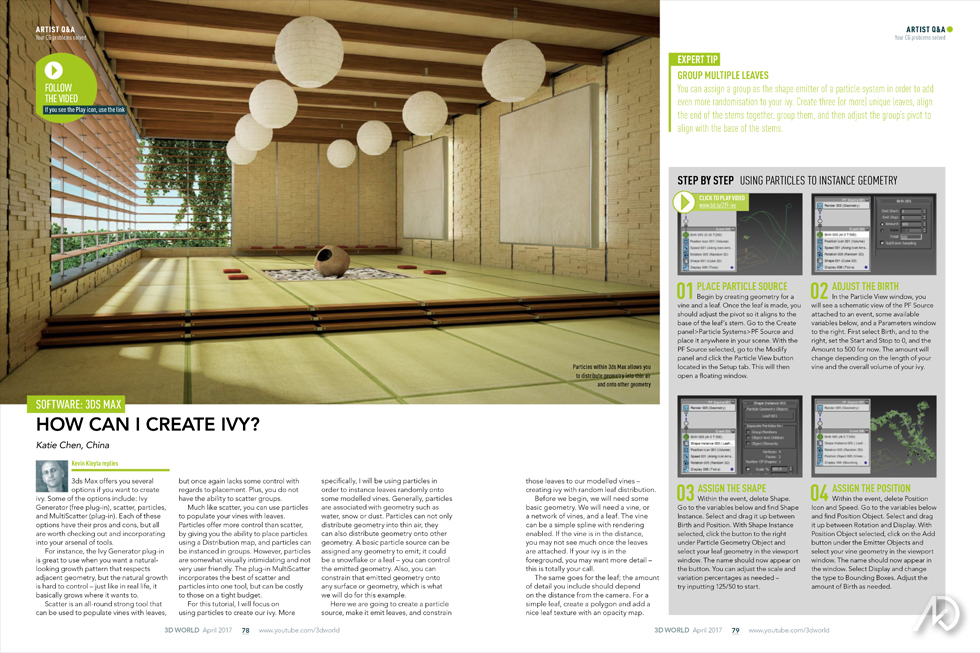
How can I create ivy?
Answer |
You have some options to create ivy when using Autodesk® 3ds Max. Some of the options include: Ivy Generator (free plugin), Scatter, Particles, and Multi-Scatter (plugin). Each of these options have their pros and cons, but all are worth checking-out and incorporating into your arsenal of tools.
For instance, the Ivy Generator plugin is great to use when you want a natural looking growth pattern which respects adjacent geometry, but the natural growth is a hard to control. It basically grows where it wants to.
Scatter is an all-around strong tool that can be used to populate vines with leaves, but once again lacks some control in regards to placement and you do not have the ability to scatter groups. Much like Scatter, you can use particles to populate your vines with leaves.
Particles offer more control than Scatter by having the ability to place particles by using a distribution map, and particles can be instanced in groups. However, particles are somewhat visually intimidating and not very user friendly.
The plugin Multi-Scatter incorporates the best of Scatter and Particles into one tool, but can be costly to those on a tight budget.
For this tutorial I will focus on using particles to create our ivy. More specifically, I will be using particles to instance leaves randomly onto some modeled vines.
Generally particles are associated with geometry such as water, snow, or dust. However, particles can not only distribute geometry into thin air, they can also distribute geometry onto other geometry. A basic particle source can be assigned any geometry to emit; it could be a
snowflake or a leaf, you can control the emitted geometry.
Also, you can constrain that emitted geometry on to any surface or geometry, which is what we will do for this example. We will create a particle sources, make it emit leaves, and constrain those leaves to our modeled vines; creating ivy with random leaf distribution.
In order to begin we will need some basic geometry. We will need a vine, or a network of vines, and a leaf. The vine can be a simple spline with rendering enabled. If the vine is in the distance you may not see much once the leaves are attached. If your ivy is in the foreground, you may want more detail; your call. The same goes for the leaf; the amount of detail should depend on the distance from the camera. For a simple leaf, create a polygon and add a nice leave texture with an opacity map.
Steps |
01 | Place Particle Source
First create geometry for a vine and a leaf. Once the leaf is made, you should adjust the pivot so it aligns to the base of the leaf’s stem. Go to the Create Panel/Particle Systems/PF Source and place it anywhere in your scene. With the PF Source selected, go to the Modify Panel and click the Particle View button located in the Setup tab. This will open a floating window.
02 | Adjust the Birth
In the Particle View window you will see a schematic view of the PF Source attached to an event, some available variables below, and a parameters widow to the right. First select “Birth” and to the right, set the start and stop to 0, and the amount to 500 for now. The amount will change depending on the length of your vine and the overall volume of your ivy.
03 | Assign the Shape
Within the event, delete “Shape.” Go to the variables below and find “Shape Instance.” Select and drag it up between “Birth” and “Position.” With Shape Instance selected, click the button to the right under Particle Geometry Object, and select your leaf geometry in the viewport window. The name should now appear on the button. You can adjust the scale% and variation% as needed; try inputting 125/50 to start.
04 | Assign the Position
Within the event delete “Position Icon” and “Speed.” Go to the variables below and find “Position Object.” Select and drag it up between “Rotation” and “Display.” With Position Object selected, click on the “Add” button under the Emitter Objects and select your vine geometry in the viewport window.
The name should now appear in the window. Select Display and change the type to “Bounding Boxes.” Adjust the amount of “Birth” as needed.
Expert Tip | Group Multiple Leaves
You can assign a group as the shape emitter of a particle system in order to add even more randomization to your ivy.
Create three (or more) unique leaves, align the end of the stems together, group them, and then adjust the group’s pivot to align with the base of the stems.