
3D World | 215
Future Publishing
Project Info |
Publication | 3D World
Issue # | 215
Issue Date | Christmas 2016
Lexicon | Publications
Created for | Future Publishing
Publication Specs |
Section | Expert Panel Q & A
Image Featured | Prohibition Hall
Page(s) | 70,74, 75
Responsibilities | Commissioned Article, 4-Part Tutorial w/ Visuals, Video Tutorial
Description |
Prohibition Hall was published in the Christmas 2016 issue, #215, of 3D World magazine; one of the top trade magazines for the 3D industry.
In order to showcase my project, Prohibition Hall, I was asked to join the “Expert Panel” as part of the Q & A segment.
For this, I was commissioned to write a 420-word article which helps to answer a given question. I then answer the question in the form of a
4-part tutorial, an “expert tip,” and supporting visuals to help explain the process. I was also commissioned to create a video tutorial which explains the process in more detail.

Question |
How can I create simple tufted geometry?
Answer |
“Tufted” is one of the worst words a 3D artist can hear. Creating tufted geometry can be very intimidating and time-consuming for some, but the creation method is actually quite simple – it is only complex in appearance. Keep in mind that tufted geometry can take-on many forms, but the basic structure is always the same and it is almost always based on a repetitive pattern.
The best advice I can give for modeling tufted geometry is, “keep it clean; keep it simple.” Geometry can very quickly become overly complicated, so try and stay in control.
If you find that your geometry is getting messy; start over. At times we waste precious minutes trying to fix bad geometry when it is usually faster to start over with a clean slate. I am not saying “give-up.”
I am simply stating that modeling is a process, and sometimes it takes a few iterations to create the best, most efficient geometry.
Most importantly, do not overwhelm yourself. Do not try and create an entire tufted sofa right out of the gate. Start by creating a single tuft, and then clone that tuft multiple times until it eventually becomes a sofa – small steps.
With visually complex geometry, like tufting, you want to break it down to its most minimal component(s), and locate the repetitive pattern/tile within the geometry. Most likely this is a single tuft, or the centralized location of one button where the majority of the geometry radiates from and connects to the center of the next button. In simplest form, a tuft resembles an x-pattern of five dots.
For this example, I will show how to create a single tuft that you can
clone, multiply, and adjust as needed. For most of the example I am actually going to focus on one quarter of the tuft, which is the true repetitive tile. Once I model and detail a quadrant, it is simply a matter of adding a few symmetry modifiers and a button in order to complete the tuft geometry.
Throughout the steps, I will be using “Reference” geometry which will be visible on the lower portion of the example images. The “Reference” geometry will have a “Turbosmooth” modifier applied to it so we can view the smoothed results interactively. Therefore, each step will show the base geometry we are creating/modifying as well as a smoothed version so we can see how each step affects our final design. I will also, include numeric measurements which should be used as reference only.
Steps |
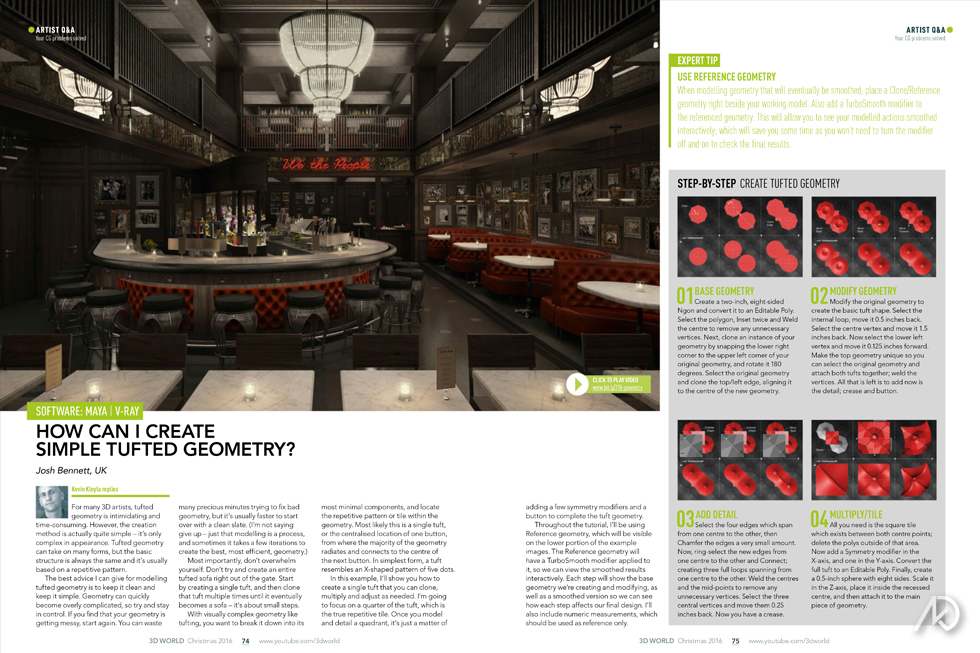
01 | Base Geometry
Create a two inch, eight-sided “Ngon” and convert it to an “Editable Poly.” Select the polygon, “Inset” twice, and “Weld” the center to remove any unnecessary vertices. Next, clone an instance of your geometry by snapping the lower right corner to the upper left corner of your original geometry, and rotate it 180°. Select the original geometry and clone the top/left edge; aligning it to the center of the new geometry.
02 | Modify Geometry
Modify the original geometry to create the basic tuft shape. Select the internal loop, move it 0.5” back. Select the center vertex and move it 1.5” back. Now select the lower left vertex and move it 0.125” forward. Make the top geometry unique so you can select the original geometry and attach both tufts together; weld the vertices. All that is left is to add the detail – crease and button.
03 | Add Detail
Select the four edges which span from one center to the other, and “Chamfer” the edges a very small amount. Now, ring-select the new edges from one center to the other and “Connect;” creating three full loops spanning from one center to the other. Weld the centers and the mid-points to remove any unnecessary vertices. Select the three central vertices and move them 0.25” back. Now you have a crease.
04 | Multiply/Tile
All you need is the square tile which exists between both center points; delete the polys outside of that area. Now add a “Symmetry” modifier in the x-axis, and one in the y-axis. Convert the full tuft to an “Editable Poly.” Finally, create a 0.5” sphere with eight sides. Scale it in the Z-axis, place it inside the recessed center, and attach it to the main piece of geometry.
Expert Tip | Use Reference Geometry
When modeling geometry that will eventually be smoothed, place a Clone/Reference geometry right beside your working model. Add a “Turbosmooth” modifier to the referenced geometry. This will allow you to see your modeled actions smoothed interactively; saving you time from constantly turning the modifier off/on to check the final results.